Do you want to learn how to grow button mushrooms from the store? From what I’ve seen, they need a room that is at least 20° warm to grow.
Just put the kit somewhere it won’t get hot again. They can get out of the base bag with just a few cross-shaped holes.
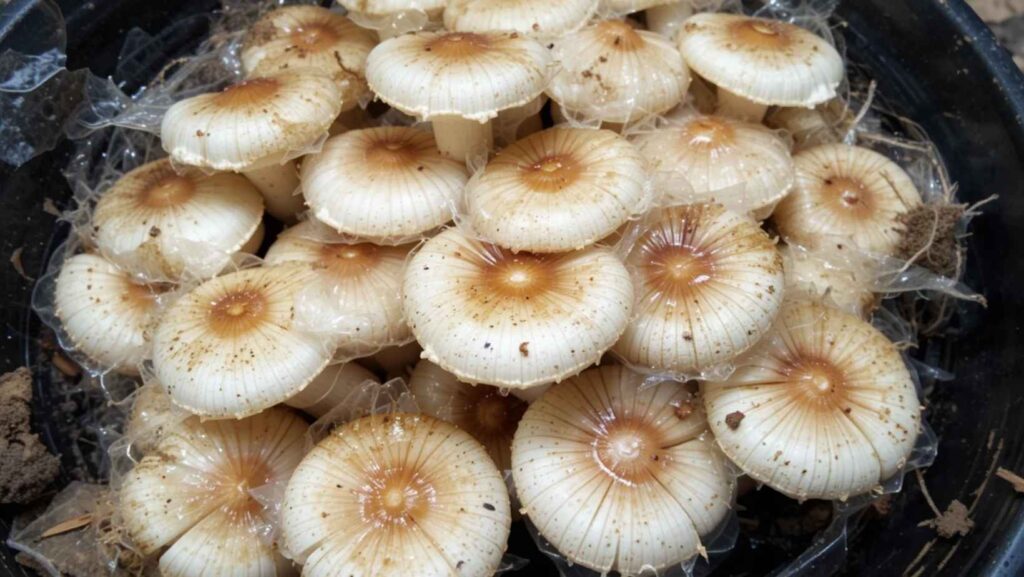
This is the first test I’ve done with used mushrooms! It’s not easy to grow, but it’s not as hard as you think if you know how they work.
Its past and how it fits in with nature are talked about in this piece. Finally, I talk about how to grow it in a cave or at home. An outline of how to grow Agaricus bisporus is given at the end of the text!
It’s time to start.
How to grow organic mushrooms
I gave in to the urge to buy these tools for raising mushrooms today. I’m excited to give them a try.
But when I open the box of button mushrooms, I find a bag of dirt inside a plastic box with a lid. I used a tool to scrape off the straw, and then I put the dirt in the cup.
I put the lid on top of it and make sure the joints can be taken apart. This lets the box’s air flow through it.
In a room inside the house that is warm enough (15 to 20 degrees Celsius), it will stay this way for three days.
If it rains, I take the dirt out of the pot and cover it with water after three days.
Every three to four days, I spray the dirt again. Mushrooms start to show up after fifteen days. If I don’t pull off the mycelium, I might be able to get three crops in total. You can pick mushrooms whenever you want.
There are fresh mushrooms to go with oysters. Things are a little different when it comes to oyster mushrooms. The tools are a pot that has already been stuffed with moss and mushroom spores.
The shell needs to be removed so that air can get to the mycelia. But be careful, because I’ll only open the kit’s two sides and not the top.
After that, I cut a cross into each side with a knife. After that, I spray water on the ground. Since it is 20°C in the room and there is some shade, I moved the box of oyster mushrooms away from the window.
I saw the first mushrooms grow after a week! A lovely sight in the kitchen!
I like to keep my kit in the fridge for as long as I need to in case I don’t need it right away.
Know what I mean? To make sure I have oyster mushrooms tomorrow, I take the bag off the cardboard and put it in a pail of water overnight.
I take it out of the water the next day and let it drain slowly. We began a new stage of growing it after putting it back in its box.
How to Grow button mushrooms on compost
You don’t have to grow button mushrooms in big rooms underground. You can get a good crop with a box and a frame or even a shed.
made up of horse dung
There needs to be enough air flow and shade from light for the culture to grow. You should also keep the temperature the same. Always sprinkle water on top of the dirt to keep it wet.
Thank you for the information.
A few days after the first gathering, a second stalk grows. It is possible to make four trips in a row if the circumstances are right for growth.
Growing button mushrooms isn’t too hard. To start the fermentation process, a pile of horse dung is put together and the temperature is raised to 70°C. It needs to be stirred twice or three times and a lot of water needs to be added all the time.
There will be no ammonia left in the soil after three to four weeks. It will be dark brown and ready to be used. You can put this manure in wooden crates if you have a shed. Use a box and a frame that will keep the weather out when you’re outside.
Get the button mushrooms that show up. In the end, mushrooms will grow from mycelium. It needs to be broken up and spread out over the whole dirt surface. After that, put it in 5 to 6 cm deep and mix it up.
How to make your own button mushrooms
With the way they are grown, fresh button mushrooms can be found in the fruit and vegetable area all year long.
To grow mushrooms at home, follow these steps. Some people have grown oyster mushrooms (Pleurotus ostreatus).
It’s easy to grow mushrooms at home with a button mushroom kit from an organic store or yard center.
When the kit was first put together, it came with seeds and a jar of packing soil, which we will see later. For the first three days, it will be very important to keep the temperature between 20°C and 25°C.
After that, the wet covering earth will be put down and left alone for a week at this temperature.
Drop the temperature to 15–18°C if you can do it in a basement once the mycelium starts to appear on top. They will start to grow and show their faces after a few weeks.
You can start with the first pick. It’s possible to go on other trips as long as the temperatures and feeding times are kept.
What materials do you need to grow button mushrooms easily
The ground will be made of button mushroom mycelium, which are the “seeds” of the mushroom.
Something that has a lid on it. On the other hand, you can grow button mushrooms in a lot of different ways, such as on racks, shelves, bags, and even boxes.
It’s too hard to explain what’s in the manure, but you can use mature soil or horse dung that has already been broken down.
If you don’t want to risk anything, I think you should buy horse dung. you can buy at yard stores, like peat and perlite, that are already mixed and ready to use.
What are the Steps for growing button mushrooms
The first step is to make sure the ground is wet.
The base will need to have water in it. In fact, the mycelium of the mushroom will need water to break down nutrients so that it can grow in the ground.
But be careful, because he will need air to work at least a little. Allow sixty to seventy percent of the water in the ground to stay there.
You can also squeeze the base by hand to see if it is too wet or not wet enough. You’ll get better at this because of practice, so the more you guess, the better.
If there is too much water on the ground, it needs to dry out. When the water level is between 60 and 70%, add more water if there isn’t enough.
Step 2: Take care of the substrate
At this point, the ground is checked to make sure there are no germs that could stop the mycelium from growing.
Before you do anything else, you should know that you don’t always need to fix the base.
The viticulturist makes the base by hand, and it then goes through a number of steps, such as being heated up and put in a box.
These steps make it possible to pick germs that are good for button mushrooms.
There are some kinds of compost and dung that may not need to be steamed. You can plant on a dirty surface, yes.
Being able to reuse the ground should have made it easier to get rid of most of the mesophilic organisms that are in competition with the button mushroom mycelium.
There will be effects, but you should know that we are of course making ourselves more likely to get sick by doing this.
If you only want to pasteurize your base, I suggest that you do it with steam at about 70°C for two hours.
Make sure that no water is added to the base during the process. I like things to be as easy as possible, so I don’t heat my base.
The third step is to fill the base.
It is mixed into the ground when the plants are planted. Mycelium is added to about 1% of the weight of the base in the button mushroom business. This is a very small amount, but it’s enough for a base that can be cleaned and handled.
As a way to improve the chances of getting good results, we like to spread out raw materials at a 10% rate.
You should put the base in the plastic jar first, then the mycelium. Combine everything. Putting on a jacket could help you keep your hands clean.
Now the lid can be put on top of the container, and the substrate can be kept in an environment that is 23 to 25°C warm. It looks like it should be used on my cumulus because it’s hot enough.
Read this if you want to know how to make a small mushroom garden.
The fungus will start to grow on every surface in ten to fifteen days.
In the fourth step, you move the box.
Once the white mycelium has fully taken over the base, we can start putting the cover in place.
There will be a layer of air and safety on top of the ground. Nearly all Agaricus mushrooms are needed for this, but the sidewalk agaric and the sun mushroom stand out as two of the most important ones.
It was made by mixing two glasses of peat, two glasses of perlite, and two glasses of water. It was well mixed before I put a layer at least 2 to 3 cm thick on top of the base.
Fifth Harvest
Things will slowly get bigger and spread out. It is best to pick mushrooms seven to ten days after they have grown.
Mycelia whose cover hasn’t been torn yet are the best.
As you pick mushrooms, be careful not to break the shell when you take them off their base. After the second or third harvest, you won’t have to clean much between crops.
What are the Steps to prepare the growing space for button mushroom
Preparing the place where the mushrooms will grow is the first thing that needs to be done to grow them right.
These things must be done in your yard for mushrooms to grow:
Picking a spot:
Moths like it when they live in cool, dark places. This could be a place that is out of the way, against a wall facing north, or under a tree. Pick a spot in your yard that doesn’t get direct sunlight. Make sure this won’t flood by making sure water can’t get in.
Getting the base ready: On the ground, fuzzy plants will grow. Choose the type of plant based on what you want to grow.
You can mix dung, straw, and wood chips. There can’t be any harmful bugs or plants on the ground.
For them to grow, they need a damp spot with lots of air flow. Mold can’t grow if the base stays damp (but not soaked) and air can flow through it.
Fumes work best when it’s between 10 and 20 degrees Celsius outside.
It’s important to keep the temperature as steady as possible.
If you live in a cold place, it might be tougher to grow mushrooms outside in the winter.
Frost might not hurt the mycelium if you cover the crop with dirt or a net over the winter. Some kinds don’t do well in cold weather, but they can still give fruit when it gets a little cooler.
Worms, snails, and even some bugs eat mushrooms to keep snakes and other pests away. When there are a lot of them, you should cover them with nets or plastic to keep them apart.
Putting ground eggshells or wood ash over the house is another natural way to keep slugs away.
Always look out for bugs and get rid of them by hand so you don’t have to use chemicals that could hurt the mushrooms.
Once the ground and place are ready, you can plant the mycelium or put together the mushroom growing kit.
What is the simplest solution for growing mushrooms
The kit to grow button mushrooms is fun and useful. People can grow button mushrooms all year with the microculture method, which is very useful.
Everything you need to make fruiting work is in the package.
This will be done in no more than four months. You can get about five different crops from a kit if you follow the directions to the letter.
Last but not least, growing white mushrooms costs between 10 and 20 euros. Organic packing is another thing that might be seen.
How to use the kit to grow button mushrooms:
This gadget has a ten-liter plastic bucket that is already full of a medium that is made just for microorganisms.
There is a certain amount of peat given. For mushrooms to grow, it needs to be spread out on the ground. Each box comes with a guidebook that you must follow.
But the basic rules stay the same no matter who gives you the plant: make sure it has enough air flow, natural and indirect lighting, steady and correct watering, a temperature that isn’t too high or too low, and a place out of direct sunlight or heat sources, like behind a window.
Have you ever thought about growing oyster mushrooms in your own kitchen? Want some help? We’d be happy to encourage you to join our fun competition, which we’re running with Prêt à Pousser.
Final thought
We now know how to grow store-bought button mushrooms. Different kinds of button mushrooms are used for various tasks.
Greenhouses were made with farmers in mind and are used in farming. Because different businesses and groups have different needs and ways of working, greenhouse plans need to be able to adapt to those.
Because of the USDA High Tunnel Grant 2021 and the USDA Greenhouse Grant 2021, farming greenhouses were used in different ways.
Some farmers grow plants vertically in greenhouses and also buy a lot of goods for greenhouse farming, which are on sale on this page at huge discounts.